sobota, 25 sierpnia 2012

Logo change animation (WiP)

Right now I'm working on an animation that I want to release before my next project. It's going to be a sort of a transition, between my current "logo" and a new real one that I've recently come up with. My current "logo" or maybe more of a recognizable thing that I've used in my movies, is based on a quake 3 advert that I scanned from a gaming magazine ages ago.


The animation I'm working on, will show this scene, falling apart, and my new logo rising from the smoke. The idea itself is quite neat, but actually doing it, is quite tricky. To set up the scene in 3ds max, I'm using free stock 3d models that I found on the archive3d site. I had to scale up each of the models and put them in their place. This alone takes a lot of time, I'm not done yet, but here's what I've put together so far.


As you can see the models aren't the same as the ones in the advert, a lot of elements are missing, but I'll take care of it. I've already cut out some parts of the ad that I'm going to use as a background in the 3d scene. Then, I'll have to animate everything, make it fall apart. Then comes rendering. To be honest with you, I don't know how to make things look photorealistic.. YET! It's something I really want to learn and I'll be reading into it more soon. Then smoke some comes in, I'll most likely add it in AE since I've already found a nifty tutorial on it.

This all might still take a while, but I'll learn a lot of new things on the way, which I'll be able to use in my future projects. This animation will be quite a milestone. More news soon.

poniedziałek, 20 sierpnia 2012

Sup

Just wanted to give everyone a little heads up. I've been a bit busy these days. I moved back home to stay here for a while. Before that, I was messing around with my new logo, because I want to get it on the site and get rid of that ugly under construction banner. I was also playing around with dm17, replacing the textures and stuff. Basicly, preparing things for my next movie project. The rocket launcher remake priority is lower now, first I'd have to finish that hard surface tutorial (which is awesome by the way). More news soon.

wtorek, 14 sierpnia 2012

Rocket Launcher remake - part 4

I didn't finish the detailing yet, after a while my hand began to hurt a bit, I was using my girlfriend's graphic tablet and I'm not used to it yet. Anyway, the details are sketched out, and I've added some gray here and there to make the metal parts look a bit like metal.


I don't like how the details look sort of organic right now, I'll have to read a bit about hard surface sculpting.

Few days ago Paul Steed passed away, he was a very talented 3D game artist mostly known for his work at Id software with the first three quakes. I picked up a book of his about modeling and animating game characters. It's a fun read and I'm learning a lot too. In the following week I'll try to model a low-poly character. Not sure about the theme yet, but I'll figure something out.

poniedziałek, 13 sierpnia 2012

Rocket Launcher remake - part 3

After sorting out the flaws and dividing some of the polygons I came to the point where I asked myself if there's something more I can do with the model in order to make things easier in ZBrush. Since the whole model isn't a single closed mesh, but actually, 7 seperate meshes that intersect with each other, I was thinking about connecting all the meshes and unifying the model, that would mess up the textures though, but it wouldn't really matter, as I'll have to texture it again in the end.


Instead, I came up with a better idea. I detached each of the meshes from the model and exported them seperatly to .obj files.


Importing each model into ZBrush was easier than I expected, since all of them had the same pivot point, the subtools (in ZBrush models are called tools) were aligned perfectly. Having each part of the gun in different subtools has a couple of benefits:
  • I don't have to worry about accidentally editing different parts of the model. (no masking needed)
  • I can subdivide each part of the model seperatly and the subdivision limits are higher. (I can leave the parts where I won't be adding details with a low polygon density)
  • If something goes very wrong, I can just import that submodel again and replace it instead of having to go back to a previously saved version of the whole file
  • Symmetry is working fine! Last time ZBrush couldn't fnd symmetry in the model, so I had to add those details to each side seperatly. Now with symmetry enabled it will take a flash.
All in all, this way seems to be the best way, it has a lot of pros and little to non cons. I don't know why I didn't think of it earlier.

The topology of the barrel is now also fine.


Here are some renders I made after a couple of subdivisions (notice the soft edges at the end of the barrel, I couldn't do that earlier, because the meshes weren't connected, instead I would get some ugly holes) and some coloring.


Here's another one with a more metal looking material. Preparing these renders took only a couple of minutes, and I think they're already looking cool. Might be a nice wallpaper once the model is done ;)


Tomorrow I'll smooth the geometry and add details, stay tuned.

niedziela, 12 sierpnia 2012

Rocket Launcher remake - part 2

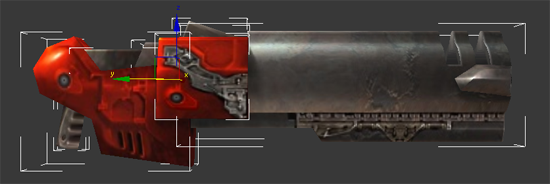
Yesterday, I didn't manage to finish detailing the model as I innitally planned. I would probably make it in time if I wouldn't encounter a problem. I kept on adding details and everything was going fine, or at least that's what I thought.


When I wanted to start adding detail to the barrel, I noticed that the bad topology that I innitally neglected won't let me edit the surface as I want to. The polygons were badly skewed and my brush strokes appeared very sharp and edgy while they should be soft.


 I tried editing the topology with preserving the details I added. ZBrush has some built-in tools for easy model retopology. After a couple of tries I gave up. All the polygon edges cluttered together was a horror to work with.

Instead, I decided to go back to 3ds Max and do what I should've done in the first place - prepare the model for editing in ZBrush. The stuff that I did to the model in max before wasn't even close to being acceptable, now I know that. I guess it just shows my inexperience.


Here are the wireframes of the original model, note that the inner part of the barrel is a seperate sub-model (pink lines). The main problem is that the polygons that make the barrel are much longer than the rest of the model, adding some skewness to that creates some nasty topology.

First, I fixed the inner part by adding some vertices here and there, moving some around, etc.


Then I divided the barrel into segments, adding a lot of vertices, and connecting them together. This way I divided the long polygons into small ones, where a bit of skewness will do little to no harm to the overall topology.


The lines aren't perfectly straight, but it doesn't really matter that much. Here's the same view, but with the inner sub-model hidden.


And the other way around:


Next I decided to weld both models together. It took me quite a while to connect all the verticles together properly without creating some weird polygons or double edges. I was checking for holes and flaws for quite a long time before I found this 3ds Max option "select non-quads" which basicly selects highlights polygons that have 3 or more than 4 edges.


As you can see I still have some fixing to do. Another thing concerns me, right now, the main part of the rocket launcher has significantly larger polygons than the barrel. This might be a problem later on in ZBrush, when after subdividing the geometry a couple of times to add details to the main part, the polygons on the barrel will be very small, and thus the polycount will go up drastically.. I'll divide the polygons on the main part of the gun for good measure.
Once I'm done with preparing the model in 3ds Max, I'll try to transfer all the details I made previously in Zbrush. If that won't work, I'll just start over. Stay tuned.

piątek, 10 sierpnia 2012

Rocket Launcher remake (WiP)

I've decided to take the good old Rocket Launcher from Quake3/Quakelive and remake it in high detail. I don't want to make it much different from the original, I've seen a couple of those fancy complicated models  and I'm not very fond of them. Rather than that I want to add detailed geometry based on the original textures:


As you can see, the textures have some details that make the blocky, low-poly models seem to be more detailed. But it's just a poor illusion, not the real thing. Back in the day, models had to be low poly because  PCs were obviously weaker. Nowadays even though the computers are much more powerful, 3D artists and model designers still have other, more advanced "illusions" such as displacement and bump maps, which make models look even more detailed. (on a side note, in the video from my last post, the skateboard has a bump map applied that immitates the grip on the deck, hah)

 So yeah, I made some renders to show you, step by step, what I've done so far.

First I've imported the .md3 file to MilkShape3D, then exported it as an .obj file. Opened it in 3DS Max and removed inner edges of some polygons. (This will come in handy later on) Afterwards, I added the textures and made some renders:

Standard rocket launcher model, the same as you can see it in-game. I really like the simple design. Someone made a really good job. I'll have to look up later who's the author.


Next, I've exported it to an .obj again and imported into ZBrush. Here I've subdivided the geometry (divided each polygon of the model) and split the model into some polygroups. They're handy, because I can easily hide parts of geometry and focus on smaller regions of the model. You can see the polygroups on the image below, each polygroup is shown with a different color.


After smoothing out some shapes I added a reference plane with the side view render image from max, this way I could easily see where are the details that I want to add to the model.


Right now I have some of the details sketched out. I'll try to finish the geometry tomorrow, then I'll have to texture it.


You might wonder why would I do such a thing. Well, the main reason is that I can make use of it later on in a frag video, and I thought it would be a nice experience. Especially since I want to remake the Sarge model too.

czwartek, 9 sierpnia 2012

My first real steps in AE

Recently I've been learning a lot of useful tools. I've learned the basics of 3DS MAX and Adobe After Effects. The result is this simple animation. It's not that special, but soon I'll be doing some more advanced things and I'll use some of them in quake movies too. Stay tuned.


Oh, and it's actually my first full HD clip. By the way, compression is wonderful - the clip went from 3,5 GB right after rendering from AE to less than 10 MB after compressing it, with little to none difference in quality. Yay to codecs and compression.

czwartek, 2 sierpnia 2012

Dragon - a ZBrush sculpture

Here it is, the dragon model I've been working on. It's based on an illustration made by my girlfriend. I finished sculpting it a couple of days ago, didn't post it till now because I was busy with some other stuff. It isn't really finished yet as some of you might guess, I still have to texture him properly, I plan to do it soon.

 
For the last two days I've been putting together a portfolio, yesterday I sent it to a local game developer studio, hah. I also had a job interview today, it went fine. I'll get back to my quake movie project soon.